How to Propagate Lavender? Skip the Cuttings!
Skip the cuttings—layering is the easiest way to propagate lavender. This method ensures healthier plants and faster growth.
Lavender is a popular herb known for its fragrant flowers and calming properties. Propagating lavender through layering is straightforward and yields robust plants. Unlike cuttings, layering involves bending a low branch to the ground and covering part of it with soil.
This encourages the branch to develop roots while still attached to the parent plant. Once rooted, the new plant can be separated and transplanted. Layering is less stressful for the plant and increases your chances of success. This method is particularly useful for gardeners looking to expand their lavender collection with minimal effort.
Introduction To Lavender Propagation
Lavender is a lovely and aromatic plant. It can be tricky to grow. Propagating lavender can save you time and money. Layering is an easy way to multiply your lavender plants. It requires minimal tools and effort.
Why Choose Layering?
Layering is simple and effective. It is a natural way plants reproduce. You can do it without harming the parent plant. This method doesn’t need special skills or equipment.
- No need for expensive tools.
- Minimal risk to the parent plant.
- Works well with woody plants like lavender.
Benefits Of Propagating Lavender
Growing lavender from layering has many benefits. It can save you money and time. You can create more lavender plants without buying new ones.
| Benefits | Description |
|---|---|
| Cost-effective | No need to buy new plants. |
| Healthy Growth | Plants grown from layering are strong. |
| Easy Method | Layering is simple and requires no special skills. |
Propagating lavender through layering also ensures the new plants are clones. They will have the same characteristics as the parent plant. This means you know exactly what to expect.
Essential Tools And Materials
Propagating lavender by layering is simple and fun. You need the right tools and materials to make the process smooth. This guide will help you gather everything you need.
Gathering Supplies
Start by collecting the essential supplies. You will need:
- Sharp Knife or Pruning Shears: For cutting the stems.
- Rooting Hormone: Helps the cuttings to root faster.
- Small Pots: To plant the new lavender.
- Potting Soil: Use soil that drains well.
- Water: Keep the soil moist.
| Tools | Purpose |
|---|---|
| Sharp Knife or Pruning Shears | Cutting stems |
| Rooting Hormone | Speed up root growth |
| Small Pots | Planting new lavender |
| Potting Soil | Provides nutrients |
| Water | Keep soil moist |
Choosing The Right Lavender Plant
Pick a healthy lavender plant. Look for these signs:
- Strong Stems: The stems should not be weak.
- Healthy Leaves: Leaves should be green and free from spots.
- Good Growth: The plant should have new growth.
A good plant ensures successful propagation. Happy gardening!
Ideal Conditions For Layering
To propagate lavender through layering, you need the right conditions. This method is easier than using cuttings. It ensures healthy growth and strong roots. Understanding the best conditions for layering lavender is crucial.
Best Time Of Year
The best time of year for layering lavender is early spring. This season provides mild temperatures. These conditions help new roots form quickly. Avoid the hot summer months. Heat can stress the plant.
Optimal Soil And Light Conditions
Lavender thrives in well-drained soil. Ensure the soil has good drainage. Sandy or loamy soil types are ideal. Avoid heavy clay soils. They retain too much water.
Lavender also loves sunlight. Choose a spot with full sun. Aim for at least 6 hours of sunlight daily. This light helps the new plant grow strong.
| Condition | Requirement |
|---|---|
| Soil Type | Well-drained, sandy or loamy |
| Sunlight | At least 6 hours daily |
Follow these guidelines for successful lavender propagation. Proper conditions ensure a healthy, thriving plant.
Preparing The Lavender Plant
To successfully propagate lavender through layering, you must first prepare the plant. This involves selecting the right branch and making the proper cut. Proper preparation ensures healthy growth and successful propagation.
Selecting The Branch
Select a healthy branch for layering. Choose one that is close to the ground. It should be flexible and free from disease. The branch should be at least 12 inches long. This length allows for easy bending and covering with soil.
Look for a branch with several leaves. This ensures it can produce energy for root growth. Remove any flowers to focus energy on rooting.
Making The Cut
Make a small cut on the selected branch. Use a clean, sharp knife to avoid damage. The cut should be about 1 inch long. This cut will encourage root growth.
Ensure the cut is near a leaf node. This is where roots are most likely to form. Be careful not to cut through the branch completely.
After making the cut, apply rooting hormone. This helps speed up the rooting process. You can find rooting hormone at most garden centers.
| Step | Action |
|---|---|
| 1 | Select a healthy branch |
| 2 | Make a small cut |
| 3 | Apply rooting hormone |
Once the branch is prepared, you can begin the layering process. Bury the cut section under soil and secure it with a pin. Water the area regularly to keep the soil moist.
Securing The Layer
To successfully propagate lavender through layering, securing the layer is essential. This process ensures the new plant develops strong roots. Let’s explore the steps to secure the layer effectively.
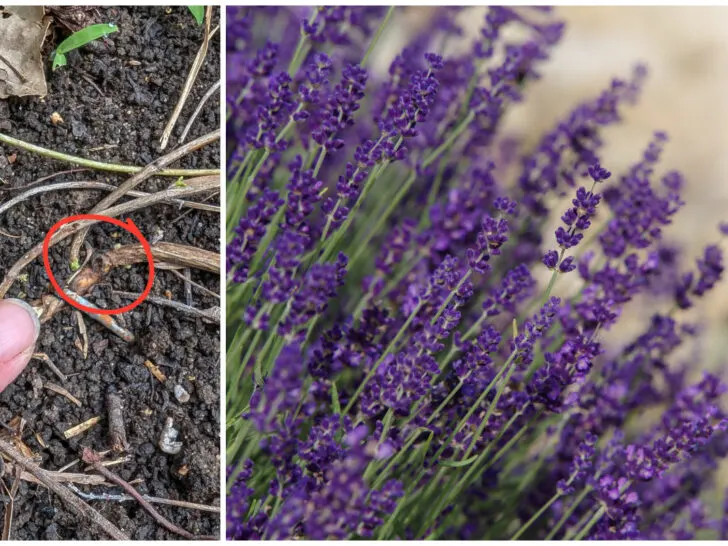
Burying The Branch
Start by selecting a healthy branch. Bend it down to the ground. Ensure the branch has several leaves. Dig a small trench where the branch touches the soil. Place the branch in the trench carefully. Cover it with soil, leaving the tip exposed. Water the soil lightly to keep it moist.
Using Stakes And Clips
To keep the branch in place, use stakes or clips. Insert a stake next to the buried section. Use garden clips to secure the branch to the stake. This prevents the branch from moving. Ensure the branch remains in contact with the soil. Check the setup regularly for stability.
Securing the layer properly ensures successful lavender propagation. Follow these steps for best results.
| Step | Description |
|---|---|
| Select a Branch | Choose a healthy, flexible branch |
| Dig a Trench | Make a small trench in the soil |
| Bury the Branch | Place the branch in the trench and cover with soil |
| Secure with Stakes | Use stakes and clips to hold the branch in place |
Credit: www.ruralsprout.com
Caring For The Layered Branch
Once you’ve layered your lavender branch, proper care ensures successful growth. This section covers essential tips for watering and monitoring the layered branch. Follow these steps for a thriving lavender plant.
Watering Tips
Watering is key for your layered branch. Keep the soil moist but not soggy. Overwatering can cause root rot, so be cautious.
- Water the soil lightly every few days.
- Check soil moisture with your finger before adding water.
- Use a spray bottle for gentle watering.
- Avoid watering the leaves directly.
Consistent moisture helps roots develop. Pay attention to the weather. Dry spells may need extra watering.
Monitoring Growth
Watching your layered branch grow is exciting. Look for new roots and shoots.
- Check for new growth weekly.
- Gently tug the branch to feel root resistance.
- Remove weeds around the plant.
- Prune any damaged leaves or stems.
Healthy growth shows the layering process is working. Strong roots anchor the branch. New shoots indicate successful propagation.
| Task | Frequency |
|---|---|
| Watering | Every few days |
| Checking for new growth | Weekly |
| Weeding | As needed |
| Pruning | As needed |
Regular care ensures a healthy, vibrant lavender plant. Follow these tips for the best results.
Transplanting New Plants
Transplanting your new lavender plants is a critical step. Proper timing and preparation ensure healthy growth. Follow these steps to give your lavender the best start.
When To Transplant
Transplant lavender in early spring or fall. These seasons offer mild temperatures. Avoid transplanting during extreme heat or cold.
- Spring: Early spring is ideal before new growth starts.
- Fall: Transplant in fall after the blooming period ends.
Preparing The New Location
Choose a sunny spot with well-drained soil. Lavender thrives in full sun. Ensure the soil is loose and well-draining.
Prepare the new location by following these steps:
- Test the soil pH. Lavender prefers slightly alkaline soil.
- Amend the soil with sand or gravel for better drainage.
- Clear the area of weeds and debris.
Once the new spot is ready, carefully dig a hole. The hole should be twice the size of the root ball.
| Step | Description |
|---|---|
| Test Soil pH | Ensure pH is between 6.5 and 7.5 |
| Amend Soil | Add sand or gravel for drainage |
| Clear Area | Remove weeds and debris |
Water the lavender plant thoroughly before transplanting. This helps reduce transplant shock.
Place the plant in the prepared hole. Ensure the root ball is level with the ground. Fill the hole with soil and gently press down.
Water the newly transplanted lavender well. Keep the soil moist for the first few weeks.
Common Mistakes To Avoid
Propagating lavender through layering is simple and effective. However, some common mistakes can hinder success. Knowing these pitfalls helps to grow healthy lavender plants. Below are the most frequent errors to avoid.
Overwatering Issues
Lavender dislikes too much water. Overwatering can rot the roots and kill the plant. Keep the soil slightly moist but not soggy. Use well-draining soil to prevent water from pooling around the roots. A good rule is to water only when the top inch of soil is dry.
| Watering Frequency | Effect on Lavender |
|---|---|
| Daily | Root rot, plant death |
| Weekly | Healthy growth |
| Monthly | Dry, unhealthy plant |
Improper Branch Selection
Choosing the wrong branch can fail the layering process. Pick a healthy branch close to the ground. Avoid branches that are too old or too young. Look for flexible, green branches without damage.
- Healthy Branch: Strong, green, and flexible
- Old Branch: Woody, brittle, and inflexible
- Young Branch: Thin, weak, and easily broken
Using the right branch ensures better root development. This leads to a more successful propagation.
Troubleshooting Propagation Problems
Even with the easiest methods, propagation can face problems. Layering lavender is no exception. Identifying issues early can help your lavender thrive.
Identifying Pests And Diseases
Pests and diseases can hinder lavender propagation. It’s important to recognize them quickly. Here are common pests and diseases to watch for:
- Aphids: These tiny insects suck sap from leaves. They cause leaves to curl and yellow.
- Spider Mites: These pests create tiny webs on plants. Leaves may become speckled and dry.
- Root Rot: Caused by overwatering, roots become mushy and dark. Plants wilt and die.
- Powdery Mildew: White, powdery spots appear on leaves. This fungus thrives in humid conditions.
Regularly inspect your plants for signs of trouble. Early detection helps manage issues effectively.
Dealing With Slow Growth
Sometimes, lavender takes longer to grow. Slow growth can have several causes. Here are common reasons and solutions:
| Cause | Solution |
|---|---|
| Poor Soil Quality | Use well-draining soil. Add sand or gravel for better drainage. |
| Insufficient Light | Ensure your lavender gets at least six hours of sunlight daily. |
| Improper Watering | Water sparingly. Lavender prefers dry conditions. Avoid waterlogging. |
| Nutrient Deficiency | Use a balanced, slow-release fertilizer. Follow the recommended dosage. |
Addressing these factors can help your lavender grow faster and healthier.
Long-term Care For New Lavender Plants
Once your lavender plants are established, they require proper care to thrive. Ensuring the right pruning techniques, fertilization, and soil maintenance is essential. This guide will help you provide the best care for your new lavender plants.
Pruning Techniques
Pruning your lavender plants is crucial for maintaining their health. Regular pruning encourages new growth and keeps the plant tidy. Follow these steps for effective pruning:
- Prune in early spring.
- Use clean, sharp shears.
- Remove dead or diseased stems.
- Trim about one-third of the plant.
Avoid cutting into the woody parts of the plant. This can harm the lavender. Pruning also helps to shape the plant and control its size.
Fertilization And Soil Maintenance
Lavender plants thrive in well-drained soil. Proper fertilization and soil maintenance are key. Here’s how to ensure your lavender gets the nutrients it needs:
| Task | Details |
|---|---|
| Soil pH | Keep soil pH between 6.5 and 7.5. |
| Fertilizer | Use a balanced, slow-release fertilizer once a year. |
| Mulching | Apply a light mulch to retain moisture. |
Ensure the soil is not too rich. Lavender prefers lean soil conditions. Over-fertilizing can lead to poor growth and fewer blooms.
Regularly check the soil drainage. Poor drainage can cause root rot. If necessary, amend the soil with sand or gravel to improve drainage.
Frequently Asked Questions
What Is The Best Way To Propagate Lavender?
The best way to propagate lavender is through cuttings. Select healthy stems, trim them, and plant in well-draining soil. Ensure they receive plenty of sunlight and water sparingly. This method ensures strong, vibrant plants.
Can Lavender Be Propagated By Layering?
Yes, lavender can be propagated by layering. Bury a low-growing branch, and roots will form. Once rooted, cut and replant.
Is It Better To Propagate Lavender In Water Or Soil?
Propagate lavender in soil for better results. Soil promotes stronger root development and healthier plants compared to water.
Conclusion
Layering is an effective and simple method to propagate lavender. It’s less stressful for the plant and ensures success. This technique saves time and effort, making it perfect for gardeners. Start layering today for healthy, thriving lavender plants. Enjoy the beauty and aroma of your own lavender garden.