How to Grow 100 Pounds of Sweet Potatoes from Just One
Growing sweet potatoes is a rewarding endeavor, particularly when you can turn a single sweet potato into a harvest of 100 pounds. This detailed guide will walk you through the process step by step, from choosing the right sweet potato to harvesting and curing your bounty. Let’s dive into the fascinating journey of sweet potato cultivation.
Step 1: Choosing the Right Sweet Potato
The journey to a bountiful harvest begins with selecting the right sweet potato. Not all sweet potatoes are created equal; some varieties are better suited for certain climates and soil types. Here are a few tips for selecting your starting sweet potato:
- Variety Selection: Opt for varieties known for high yields and disease resistance. Popular choices include ‘Beauregard’, ‘Covington’, and ‘Georgia Jet’.
- Healthy Specimen: Choose an organic sweet potato, as non-organic ones might be treated with chemicals that inhibit sprouting.
- Sprouting Potential: Look for a sweet potato that already shows signs of sprouting, which indicates vigor.
Step 2: Creating Slips
Sweet potatoes are grown from slips, which are shoots that grow from a mature sweet potato. Follow these steps to create slips from your chosen sweet potato:
- Cutting and Submerging: Cut your sweet potato in half or into large sections, ensuring each piece has at least one eye. Place the cut pieces in water, with the cut side down and the sprouting side up. Use toothpicks to suspend the sweet potato in a glass of water.
- Warm Environment: Place the glass in a warm, sunny spot. A temperature of around 75-80°F (24-27°C) is ideal. Ensure the water level is maintained.
- Wait for Sprouts: In about 2-4 weeks, sprouts (slips) will start to emerge from the top of the sweet potato. Each slip should be about 6 inches long.
Step 3: Preparing the Slips
Once your slips have grown, it’s time to prepare them for planting:
- Remove Slips: Gently twist or cut the slips away from the sweet potato base.
- Rooting Slips: Place the slips in a jar of water, with the bottom of the slip submerged. They will develop roots in about a week.
- Transition to Soil: Once the slips have established roots, they are ready to be planted.
Step 4: Preparing the Planting Site
Sweet potatoes thrive in warm, well-drained soil with plenty of sunlight. Here’s how to prepare your garden bed:
- Soil Preparation: Choose a location that receives full sun for at least 6-8 hours a day. Sweet potatoes prefer sandy loam soil. Amend your soil with compost to improve fertility and drainage.
- Raised Beds or Mounds: Sweet potatoes grow best in raised beds or mounds. Create mounds about 8 inches high and 12 inches wide. Space the mounds about 3 feet apart.
- Soil Testing: Test your soil pH, aiming for a range of 5.8 to 6.2. Adjust the pH if necessary using lime or sulfur.
Step 5: Planting the Slips
With the slips ready and the soil prepared, it’s time to plant:
- Timing: Plant the slips after the last frost when the soil temperature is consistently above 65°F (18°C).
- Planting Depth: Plant each slip 4-6 inches deep, burying the lower leaves and leaving the top leaves above the soil.
- Spacing: Space each slip about 12-18 inches apart in rows that are 3 feet apart. This spacing allows ample room for the vines to spread and the tubers to grow.
Step 6: Caring for Sweet Potato Plants
Caring for your sweet potato plants properly will ensure a healthy and productive harvest:
- Watering: Keep the soil consistently moist but not waterlogged. Water deeply once a week, increasing the frequency during dry periods.
- Mulching: Apply a thick layer of mulch around the plants to retain moisture, regulate soil temperature, and suppress weeds.
- Fertilizing: Fertilize with a balanced, slow-release fertilizer at planting and again mid-season. Avoid high-nitrogen fertilizers, as they can promote excessive vine growth at the expense of tuber development.
- Weeding: Keep the planting area weed-free to reduce competition for nutrients and water.
Step 7: Managing Pests and Diseases
Sweet potatoes are relatively hardy but can still fall prey to pests and diseases. Here’s how to manage common issues:
- Pests: Watch for pests such as sweet potato weevils, aphids, and wireworms. Use organic insecticides or natural predators to control infestations.
- Diseases: Common diseases include root rot, fusarium wilt, and nematodes. Practice crop rotation, use disease-resistant varieties, and maintain good garden hygiene to minimize risks.
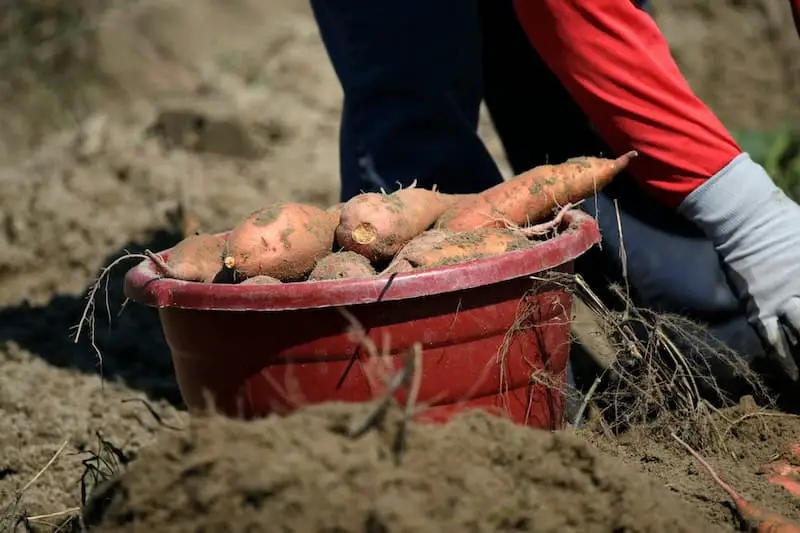
Step 8: Harvesting Sweet Potatoes
Knowing when and how to harvest your sweet potatoes is crucial for maximizing your yield:
- Timing: Sweet potatoes are typically ready for harvest 90-120 days after planting. The leaves will start to yellow, indicating maturity.
- Harvesting Technique: Choose a dry day to harvest. Use a garden fork to gently lift the sweet potatoes from the soil, being careful not to damage the tubers.
- Curing: After harvesting, cure the sweet potatoes by storing them in a warm (80-85°F) and humid (85-90% humidity) environment for 10-14 days. This process helps to heal any cuts and convert starches to sugars, enhancing flavor and shelf life.
Step 9: Storing Sweet Potatoes
Proper storage is essential to keep your sweet potatoes fresh for months:
- Storage Conditions: Store cured sweet potatoes in a cool (55-60°F) and dry (60-70% humidity) location, such as a root cellar or basement. Avoid refrigeration, as temperatures below 50°F can cause the tubers to develop an off-flavor.
- Monitoring: Check your stored sweet potatoes periodically for signs of spoilage, such as soft spots or mold. Remove any affected tubers to prevent the spread of decay.
Step 10: Scaling Up Production
To achieve a 100-pound harvest from a single sweet potato, you’ll need to scale up your planting:
- Slip Multiplication: Each sweet potato can produce multiple slips, and each slip can yield several pounds of sweet potatoes. By carefully managing and multiplying your slips, you can increase your planting stock exponentially.
- Expansion: Dedicate more garden space to sweet potatoes each year, and continue to refine your growing techniques for higher yields.
Step 11: Sustainable Practices
Adopting sustainable practices will ensure the long-term health of your garden and the environment:
- Crop Rotation: Rotate your sweet potato crop with other non-related plants to reduce the risk of soil-borne diseases and pests.
- Composting: Incorporate organic matter into your soil regularly to maintain its fertility and structure.
- Water Conservation: Use drip irrigation or soaker hoses to minimize water waste and ensure efficient moisture delivery to the plants.
Step 12: Enjoying Your Harvest
Finally, savor the fruits of your labor:
- Culinary Uses: Sweet potatoes are incredibly versatile and can be used in a variety of dishes, from savory casseroles to sweet pies.
- Sharing: Consider sharing your bountiful harvest with friends, family, and neighbors. You can also donate excess produce to local food banks or community kitchens.
Conclusion
Growing 100 pounds of sweet potatoes from a single sweet potato is an achievable goal with the right techniques and dedication. By following this comprehensive guide, you’ll be well on your way to enjoying a plentiful and rewarding harvest. Happy gardening!